

3D printing Poser content – 12 lessons learned
Patrons can access downloadable PDFs of most stories, 4K versions of many images, and content that I chose not to publish publicly here.
Please consider donating to my Patreon in order to receive access. Click here to find out more.
Hi guys, for those of you thinking of buying your own 3D printers for printing your own adult-themed work, I’ve learned so much this past week. Many disasters, many failed prints but things working surprisingly smoothly and consistently now.
Here are the lessons I’ve learned:
 Bed levelling is key.
Before you can even start printing, the bed (surface on which you will print) MUST MUST MUST be properly levelled at all four corners and the middle. You might get away with a poor calibration on one corner, but as the print size increases, the smaller imperfections come into play. If it takes 30 minutes or two hours to do this stage, I PROMISE, the time is worth it. It’s like the difference between pumping your car tires up or trying to drive on the rims. It really is that significant.
 Don’t print without a base
Whilst it’s appealing to print DAZ/Poser figures (from now on simply called Poser figures) standing on their own feet, in the real world finding a balance point is harder than you think. Better off to place them on a base, then the base will hold them upright.
 Forget about fine details
The amount of detail you can print depends upon the resolution you print at. My Creality CR10s can print down to 0.1mm in the vertical axis, but only 0.4 in the X and Y planes. This assymetry is the norm for most afforable printers. That means that I can theoretically print something to one tenth of a millimetre in size. Nope, forget it. Not even close. The functional minimum of this printer is actually .12mm – anything less is fractional degree of its actual vertical resolution. But realistically, allowing for clean up, and model resolution, I think you’d be pushed to create detail of 0.5mm – maybe even as high 1mm. That’s great for many purposes, but just bear in mind that you cannot take a beautiful detailed 8 foot sculpture, print it 5cm tall and expect to retain the same quality! You could print larger but then expect print times last days!
But here’s the REAL STINKER, if your model has details such as fingers, furniture, pipework, etc, that’s almost certainly going to snap off irreperably during clean up.
 Take your time with your clean up
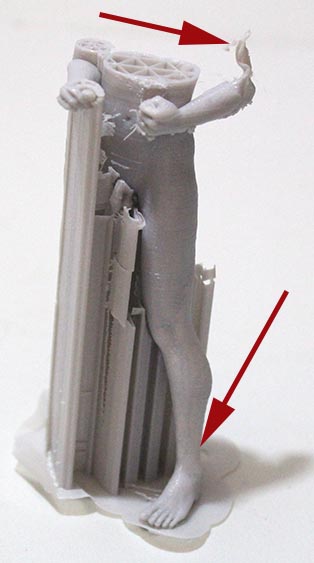
Unless the model was specifically designed with no overhanging parts, it will include support. Support is a series of very thin vertical struts that will enable to print parts of the model that would otherwise hang in the air. After printing, you must manually clean up the model, removing the support with your filament snips and other tools. Complicated models may take an hour or more to clean up. I have wasted more models at this stage, accidentally snapping off limbs and body parts. Do not use other parts of the model as levers for snapping off support. Do not be over-ambitious about how much to remove at a time. Be prepared to remove fine support with tweezers.
Give smaller models thicker walls
This may initially sound counter-intuitive, after all larger models need more strength right? But smaller models will have less limb or digit thickness overall. Imagine a figure 30cm tall – its limbs may be 2cm across. Even with a wall thickness at the default of 0.8mm, that’s still a lot of plastic. Now scale it down to 10cm tall and its limbs will be barely 0.5cm – that’s extremely easy to snap during clean up. I carfully printed and reprinted one Poser figure, and finally got it to print at just the right resolution, standing on a nice base, then I knocked it over and it snapped off its pedestal at the ankles. Grrrr!
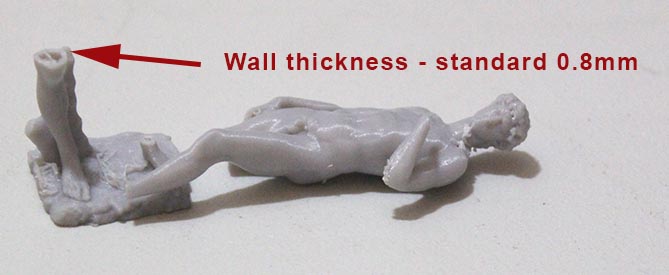
I suggest a wall thickness of 1mm for delicate smaller figures. Squat figures such as a seated buddha will not be so fragile so you can get away with the Cura default of 0.8 or perhaps even less if you are desperate to save print material.
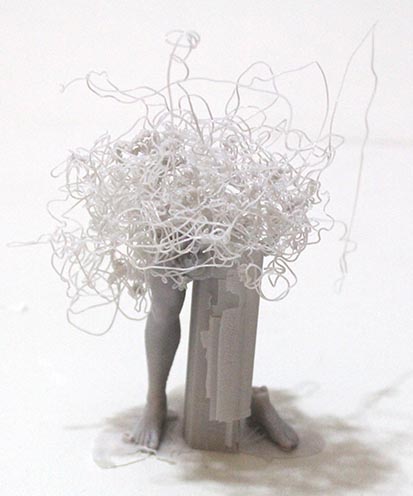
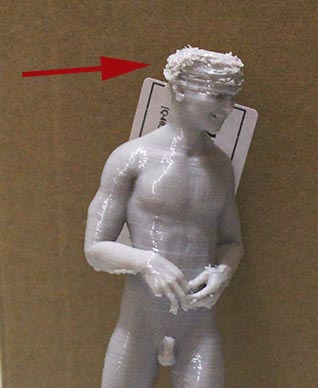 Hair is problematic
Poser uses 4 different techniques for creating hair: fibremesh/hair sim, transparency mapped billboards, displaced head geometry, sculpted. The first two are the most popular because they produce superb rendered results but they absolutely cannot be used for 3D printing. 3D printers cannot handle the fine resolution of hair simulations or fibremesh, and they cannot convert transparency maps into actual geometry.
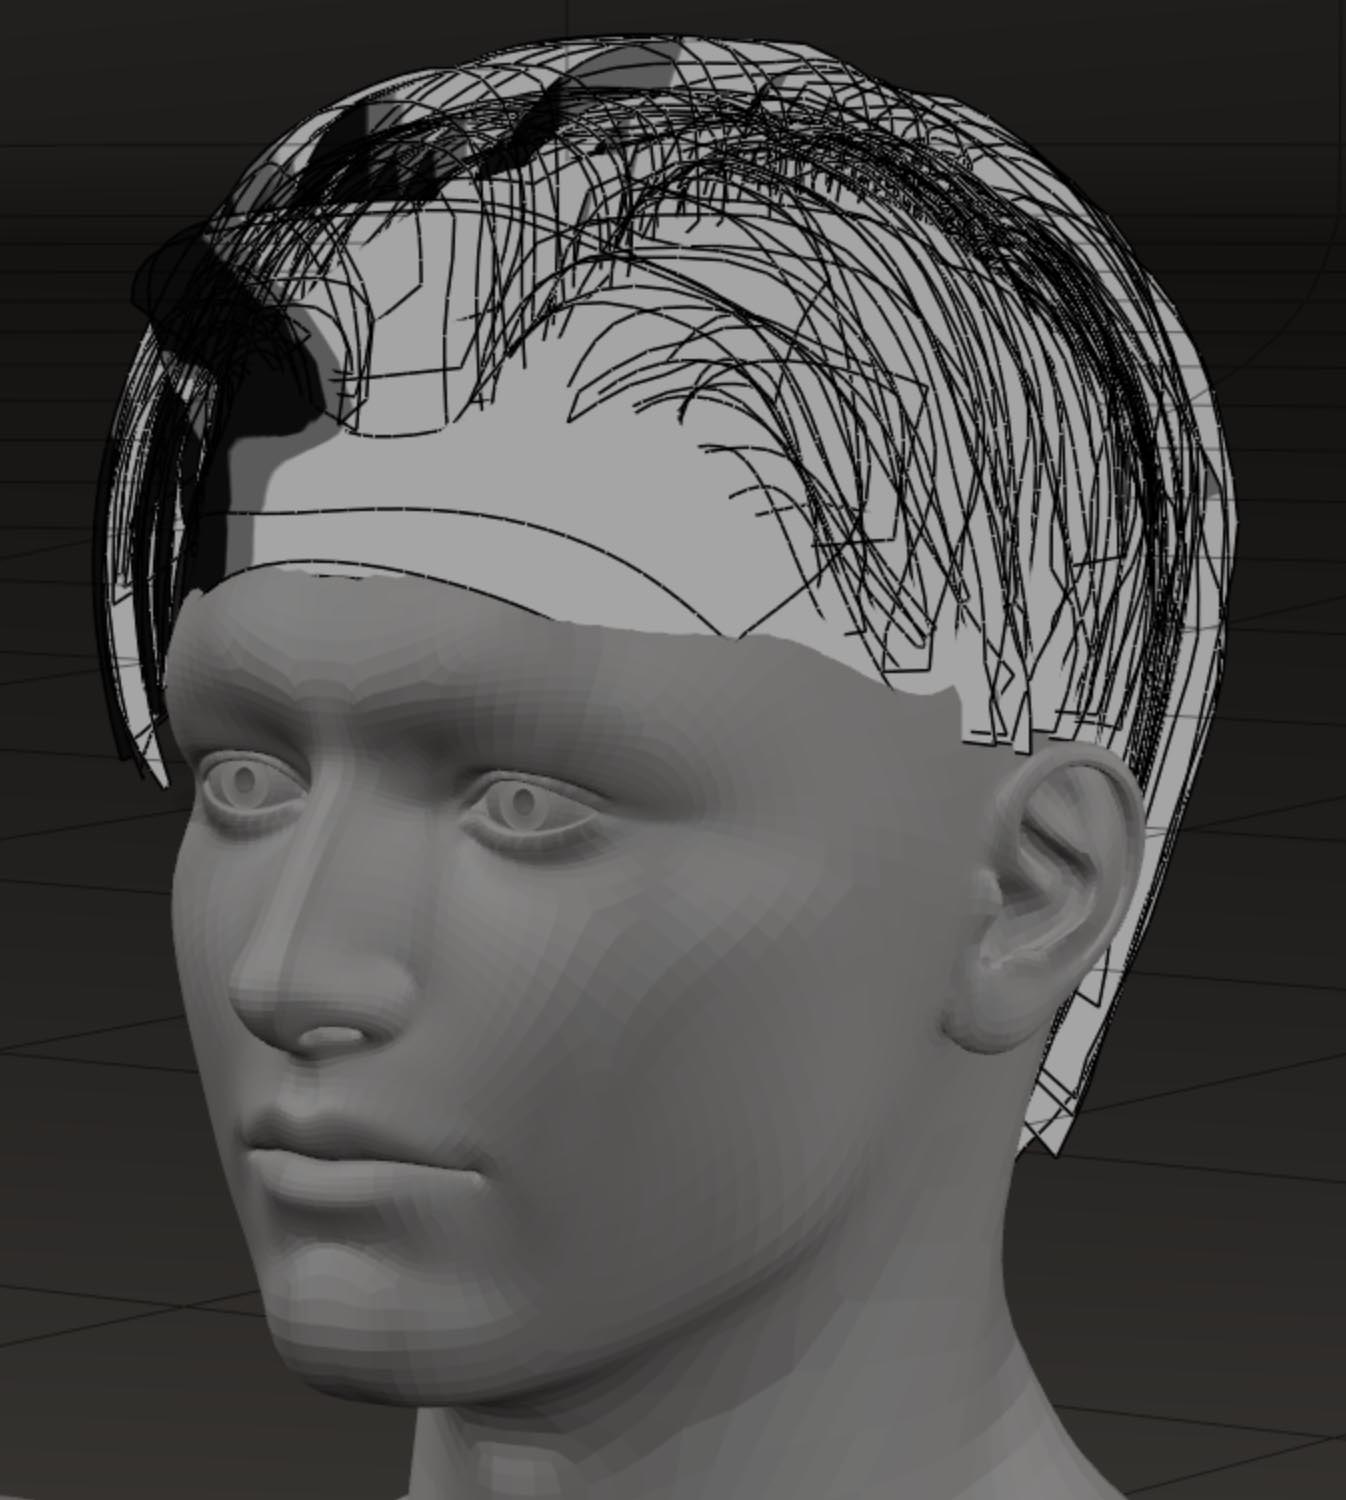 Some older figures such as Michael 4 have a hair option in the head morphs. This produces varying degrees of a very simplistic 1960s dad or preppie hair cut. Some female hair styles, such as pony tails, use modelled gemoetry rather than just trans-mapped billboards. These will also work. The easiest way to tell is by looking at the hair in Poser or DAZ using an untextured solid shaded view. This will reveal the way way that the hair has been constructed. Remember, your printer cannot reproduce planes of zero thickness.
Ironically, one possible solution is to use the old Poser hair figures that were created before trans-mapping. You may also find some cartoon hairstyles are workable.
Exporting models for print
Before you can think about printing, you need to get your model from Poser or Daz Studio into a printable format. To do that you will first need to give them to slicer software (mostly free) so that it can produce the STL files your printer can read.
Slicer software will be able to read models in OBJ format so I suggest that you export in that format.
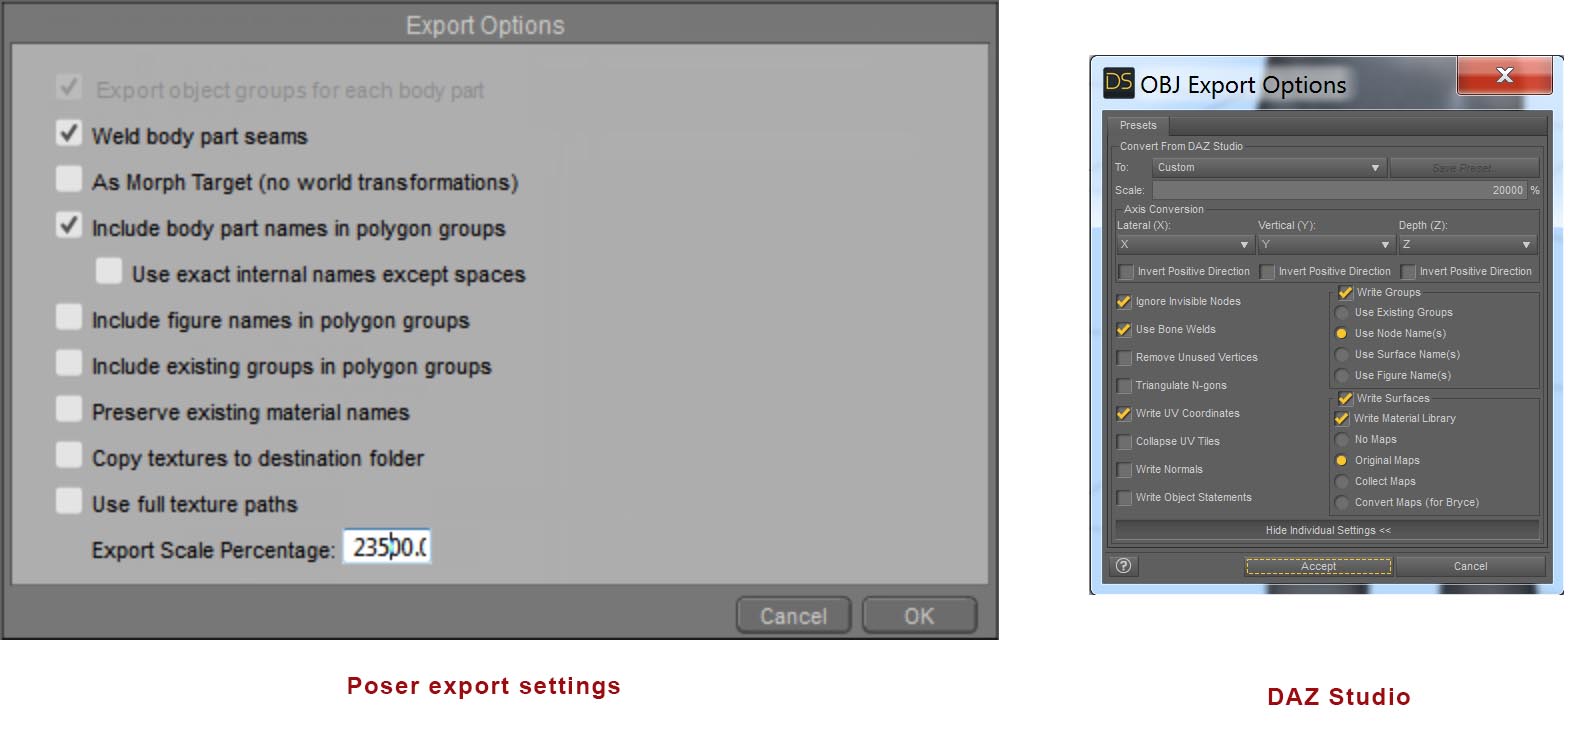
Choose DAZ or Poser’s export option, then select the parts that you wish to export. Do NOT export eyebrow, pubic hair, or null objects.
I strongly recommend against exporting large sets, but plinths, walls, stands, or basic elements will work fine. Grass, trees, large building, anything that depends upon transparency maps or billboards will not.
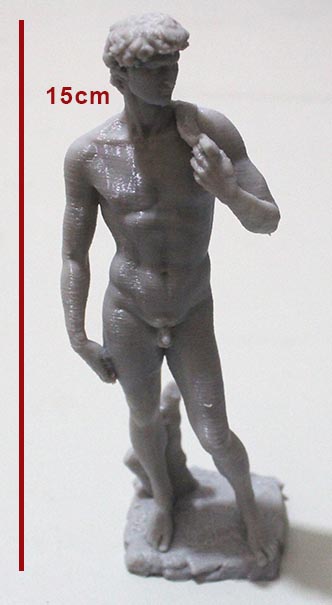
When you have selected the exports, change the scale. In DAZ, exporting at 100% will give a figure about 18.6cm tall and scaling up by 23,500 in Poser gives a figure size around 18cms in Cura.
 At this stage, I MAY import my model into 3D Studio Max for further adjustment such as closing holes, creating caps, changing orientation or creating stands. This is not necessary but can be useful.
If you are exporting from a 3D modelling program after tweaking, I find that exporting the topology triangles rather than squares or polygons is MUCH faster and produces the best results. Remember, animation is NOT the goal here.
 Bed adhesion is vital
When 3D printing, each layer is printed on top of the one before. The base layer is printed directly onto your printer’s bed and if that layer does not stick well, there’s a high chance that at some point, the nozzle with bump your model, dislodging it and ruining the print.
In this photo you can see that the brim has peeled off the bed resulting in a failure many hours into the print.
With the Creality, that bed is made of glass. With other printers it can be made of glass or a range of technical materials. Glass gives a lovely flat surface, vital for an even level, but it does not make for good first layer adhesion because it’s so smooth. Many people buy a special bed, I bought a product called MagiGoo. It’s a very fine liquid that you spread over the expect print area direct from the applicator bottle. It’s expensive, but since I bought it I have not had a single model dislodge so I strongly recommend buying some if your printer has a glass bed. You don’t realise how much you need it till you get it!
 Genital attachment
If you are going to include male genitals in your prints, at sizes below a total model height of 15cm they will be too small to see any real detail, but they will still print. However they are vulnerable to being snapped off during clean up. The great news is, DAZ’s geo-grafting technology works just fine. If you are using Michael 4, I suggest that for structural strength, you embed the genital inside the model slightly (the Z direction) so that there is not an external join.
 Clothes
Clothes can be hit and miss depending upon the way that they’s been modelled. Anything depending upon transparency mapping for structure will lose that detail. This includes body suits, underwear, and clothes with clear or semi-opaque panels. Clothes such as shoes and hats and sunglasses and trousers are pretty good – if brittle, but flowing items suchas skirts and coats may be completely unusable unless they have shells.
Model orientation affects strength
The finished print is weakest in the printer’s Z plane, which is the direction in which the layers are built up, but it also has the most detail in that direction. You can orient your model in any direction on the print bed, although vertical or horizontal for a standing figure are the only two that make sense. By lying your figure down, you can dramatically increase its vertical strength at the expense of detail. The choise is yours.
 Learn your printer’s magic numbers
I was shocked at how much difference this made both in terms of reducing print time and improving quality. Your printer has a vertical resolution determined by the number of subdivisions in its vertical stepper motor. If you print at a resolution which is a fractional part of that resolution, you will achieve sub-optimal quality no matter what resolution you print at. For the Creality machines, that resolution is in increments of 0.04mm, starting with 0.12 as the finest, then 0.16, 0.2, 0.24, 0.28, 0.32, 0.36 and 0.4.
I got this information from a terric youtube video that you can see here
This is some very nice information…thank you for putting it out there. Could you do one more thing?
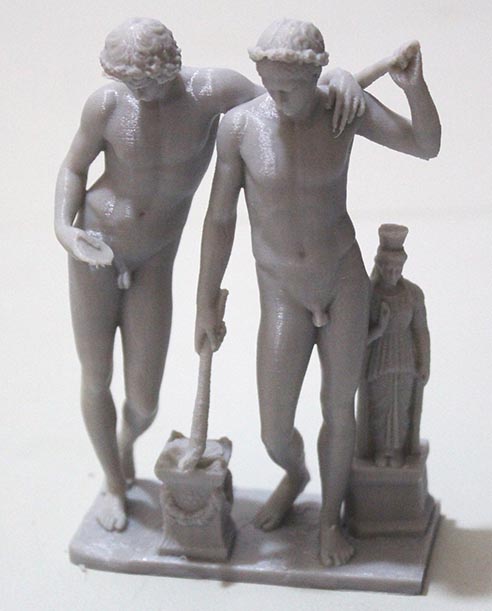
From say the above model of the two workers standing by the anvil…a list of actual programs need to the to the point of printing?
You have mentioned DAZ, Poser and 3D Studio Max. Not sure if it was here, but thought I’d heard support for Poser has gone downhill considerably and now not sure if it is worth upgrading or if there is something better now? You have mentioned a ‘slicer’ program and Cura…which after a quick google while typing this I see is a slicer program- the ideal one because it appears to be free or is the difference between this and paid program mostly fripperies?
Basically, just trying to get an idea of costs aside from the printer.
Again, thanks for your efforts on this subject.
Christopher